Flooring take-off straight from your IFC building model (BIM)
If your project already exists as an IFC file, you shouldn't have to re-trace every room by hand to get a material list. Autolay reads room boundaries directly from the building model.
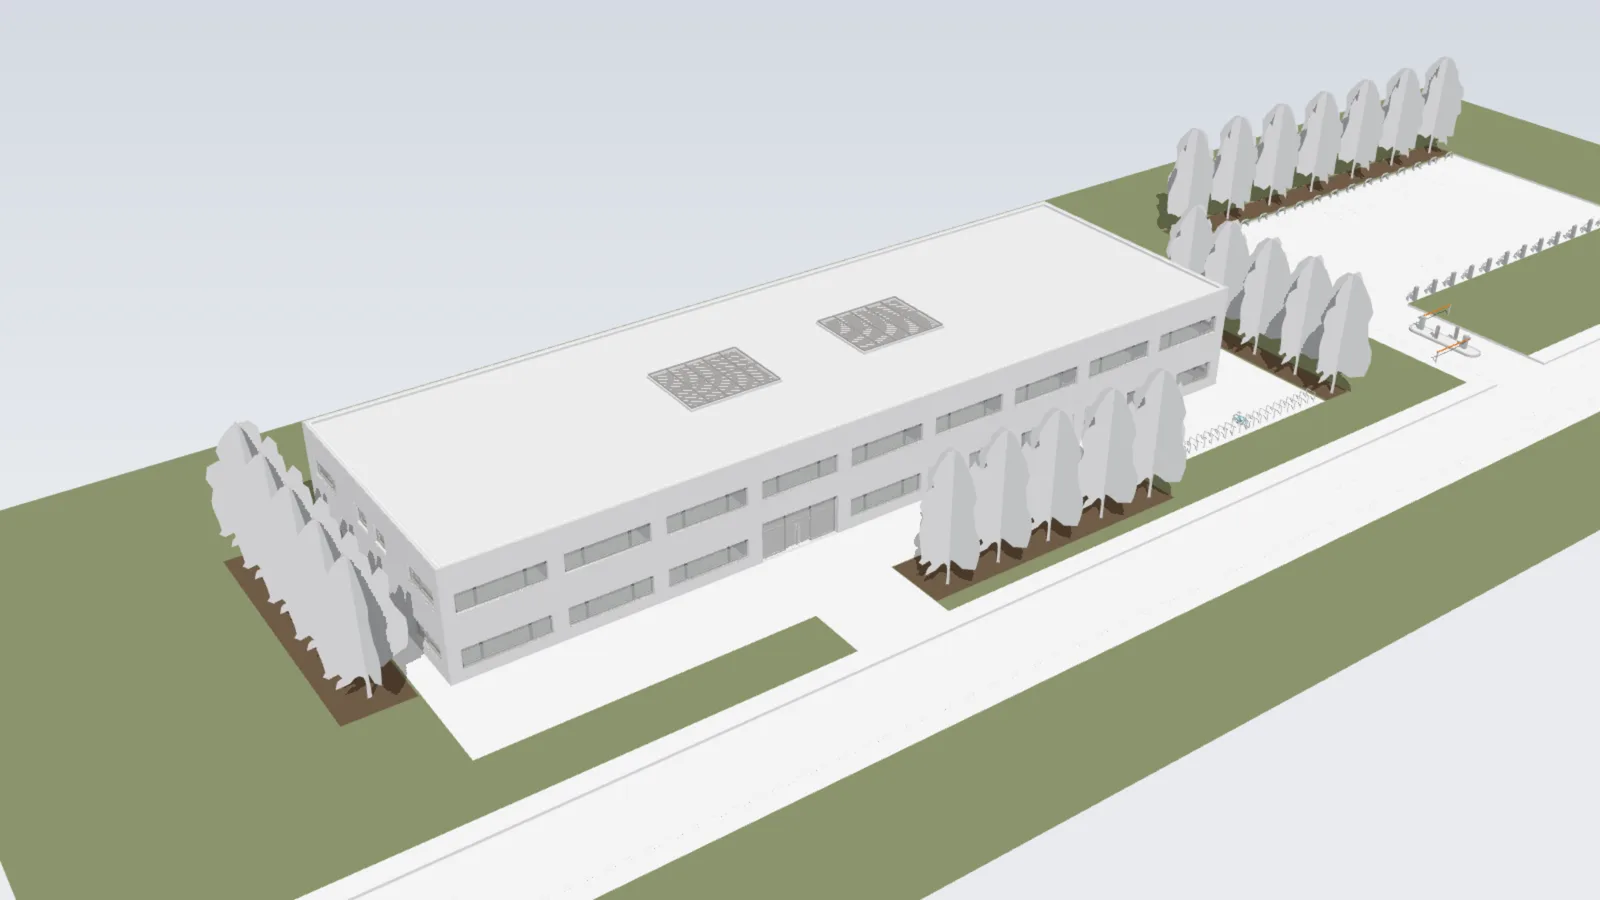
An IFC file already contains IfcSpace and IfcWall entities with the real-world room boundary geometry the architect modeled. Instead of re-tracing a printed floor plan by hand — slow, and prone to measurement error — Autolay's web-ifc-based viewer loads the .ifc file client-side, lets you select the rooms (IfcSpace boundaries) you want flooring for, and hands those exact boundaries to the same layout engine used for hand-traced rooms.
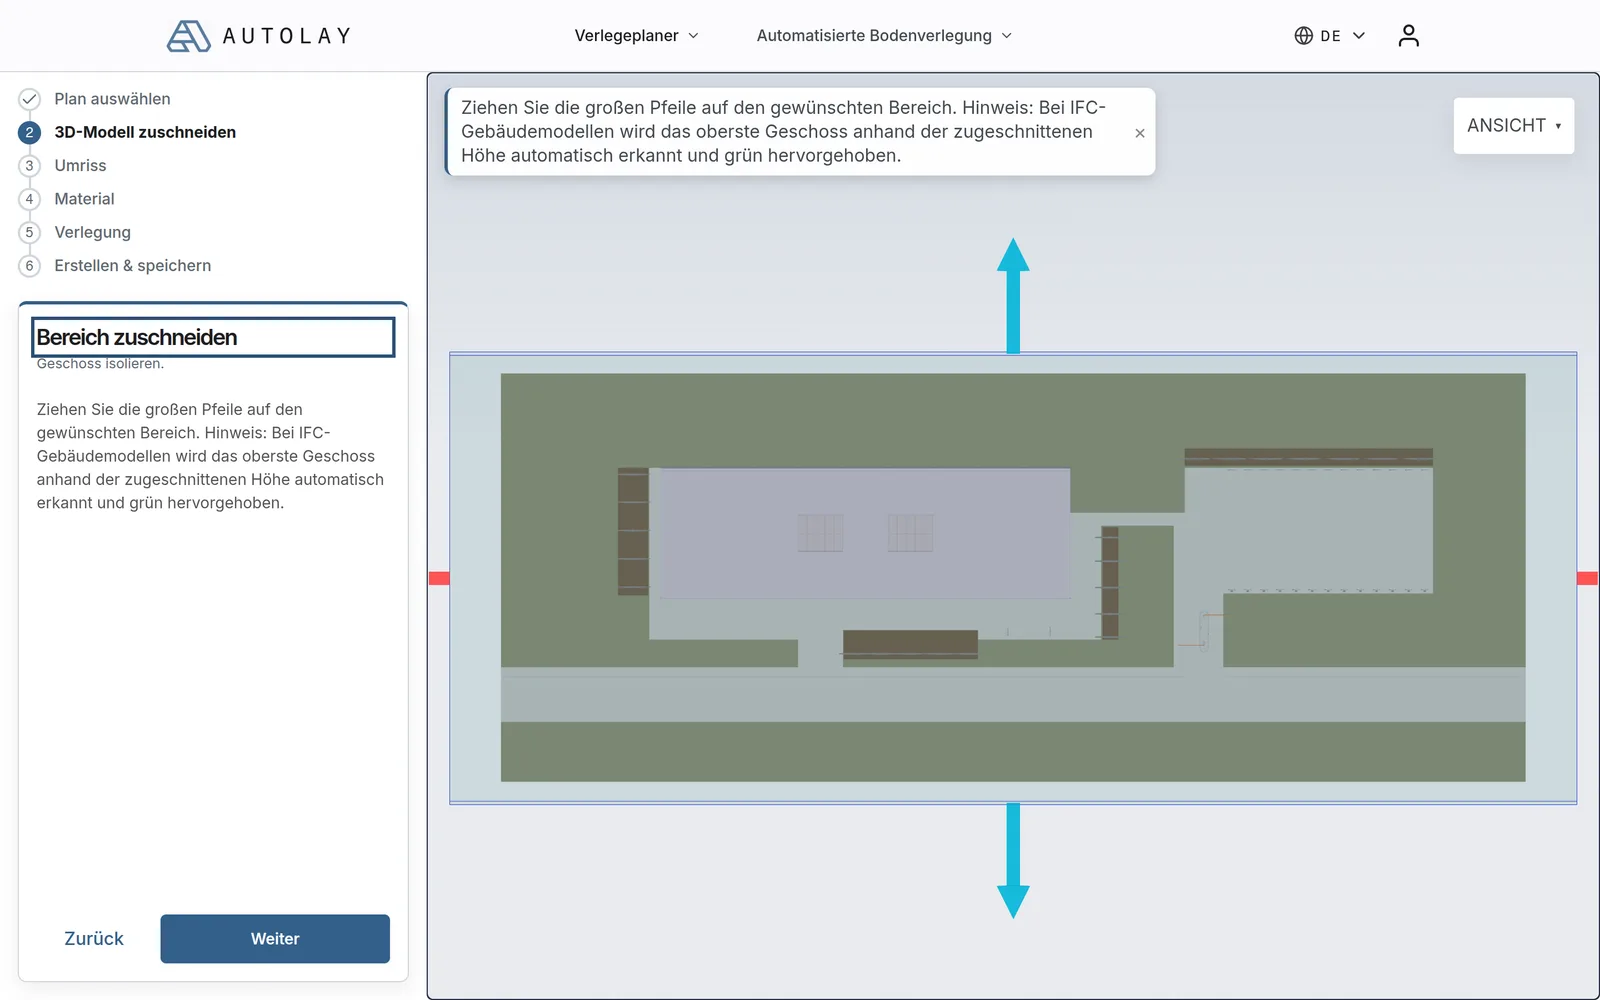
Step 1
Choose the story
Slide the crop box to the story you want to floor. The floor surface is detected from the geometry and highlighted, so a model without tagged rooms works too.
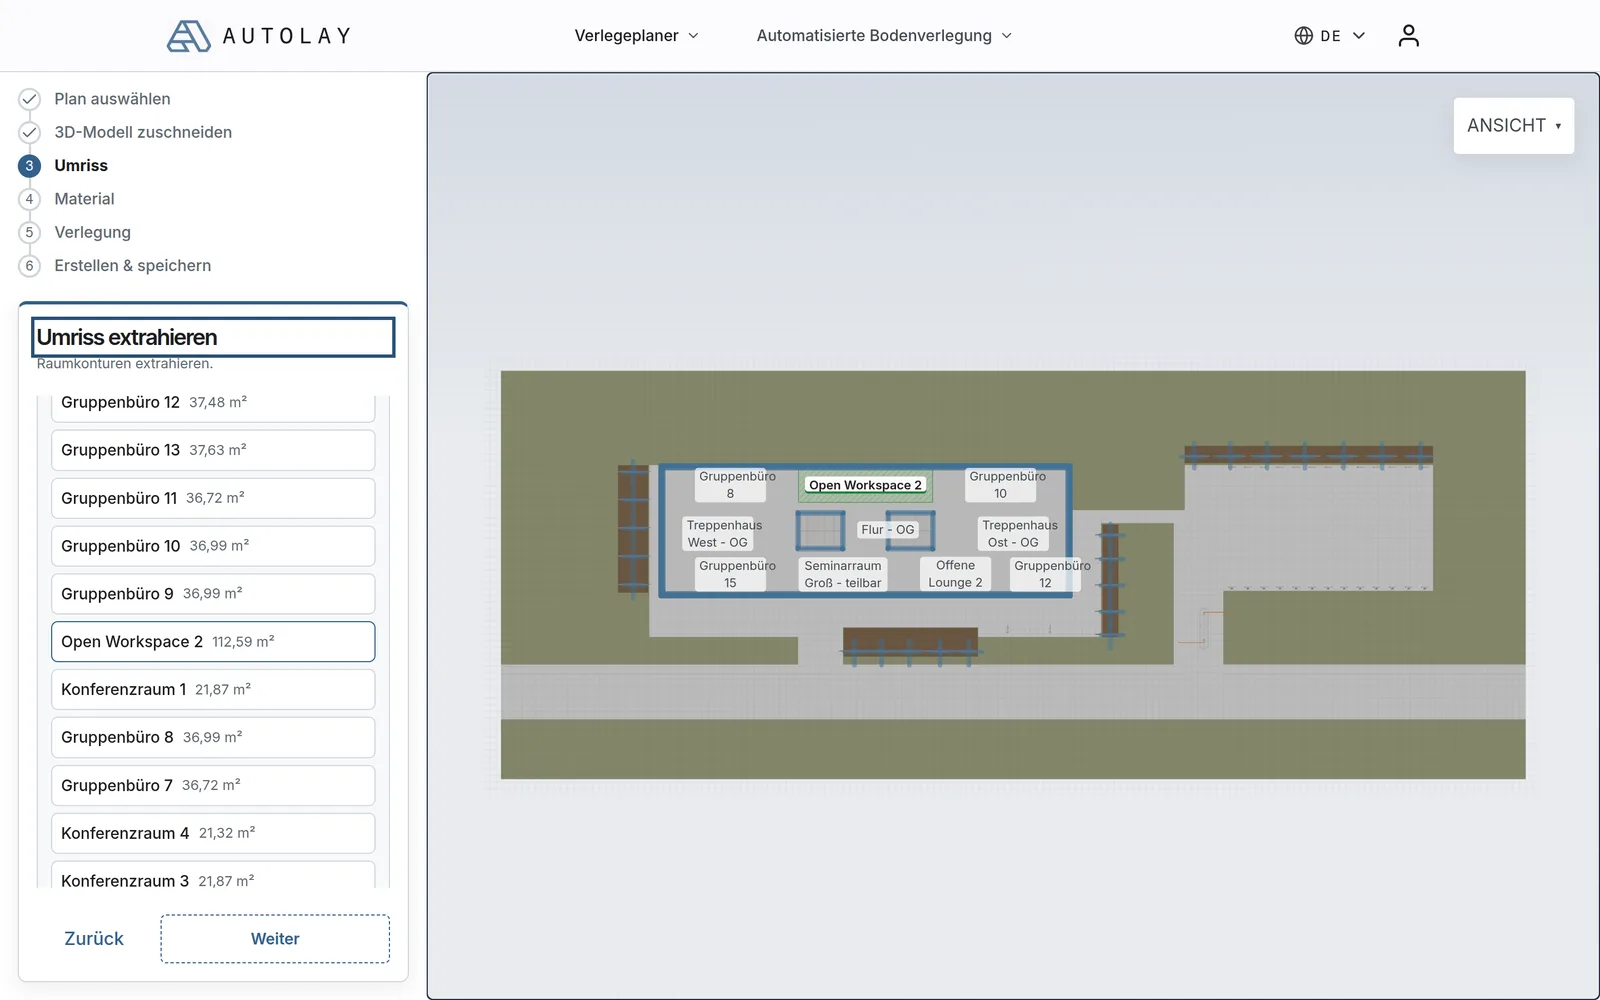
Step 2
Pick rooms from the list
Every room the model names appears in a list with its area. Point at one and it lights up in the model; one click takes its outline over, nothing to trace.
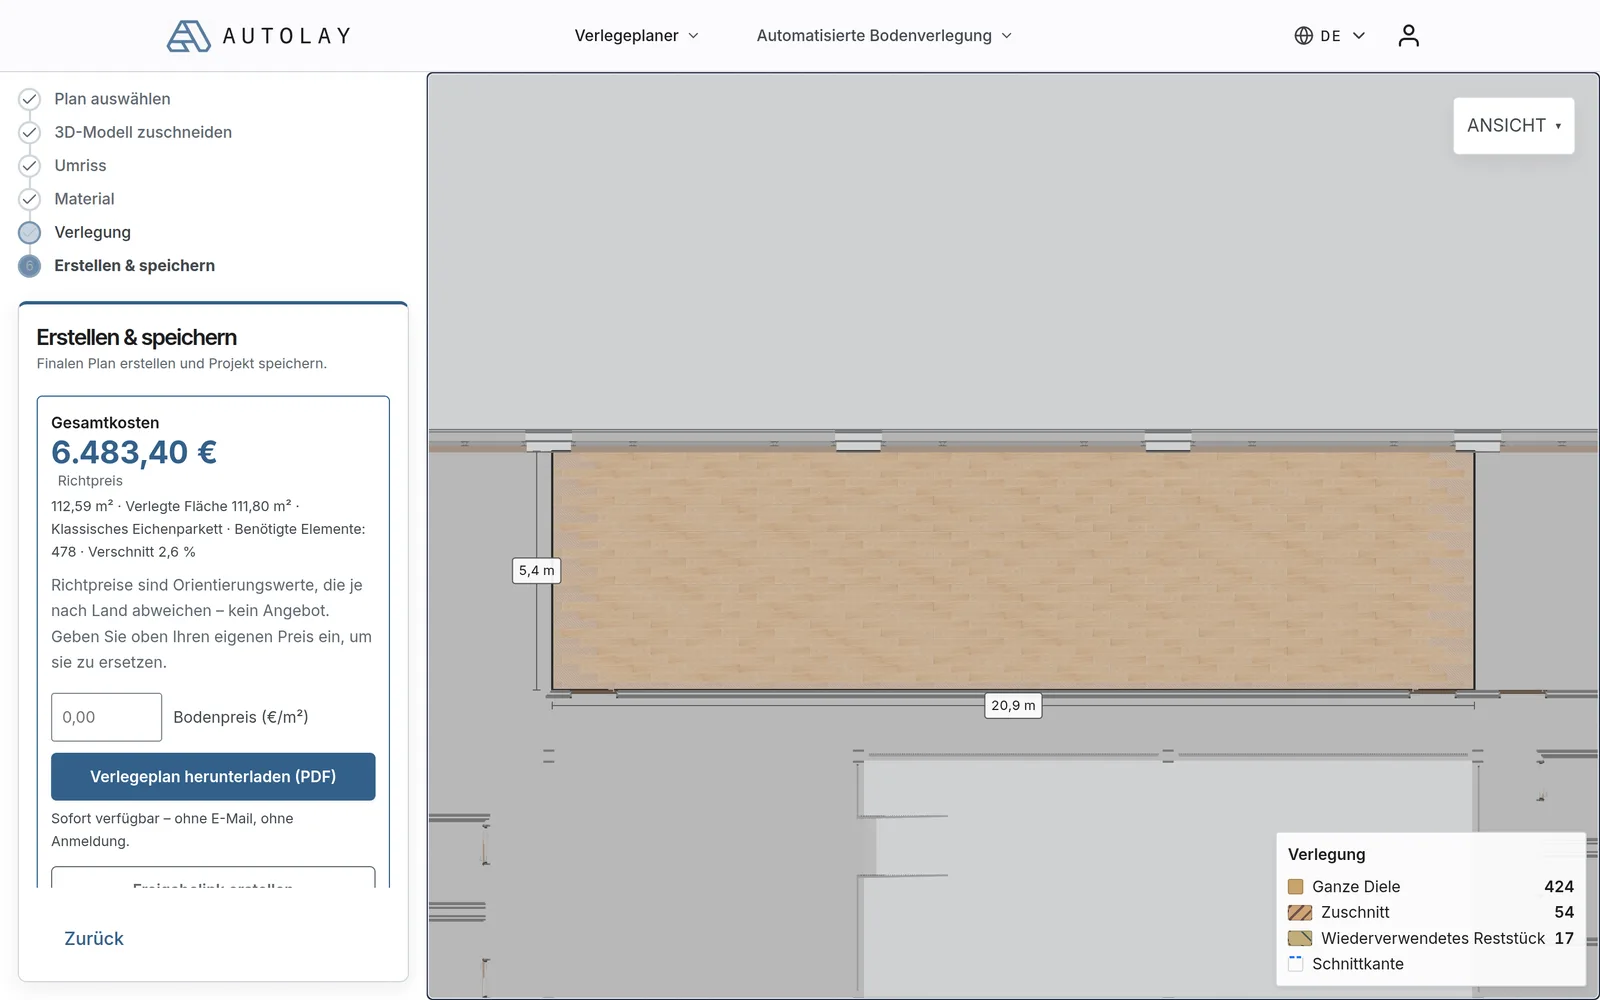
Step 3
Get planks, packs and waste
Choose the flooring and the pattern; the planner lays the room plank by plank and tells you the exact piece count, the waste and a guide price, with a plan to download.
What's inside our demo IFC file
64 rooms across 3 stories — basement, ground floor and upper floor — each carrying its own net floor area
30,591 sq ft of net floor area in total, with rooms ranging from 43 sq ft to 4,133 sq ft
178 walls, 64 doors and 47 windows around those rooms — geometry the take-off filters out automatically
All numbers come from the free demo file itself: an IFC4 export from Autodesk Revit 2019, 9 MB. The demo button at the top and the bottom of this page loads exactly this file — check them for yourself.
Take-off from IFC building models — frequently asked questions
Can I upload an IFC building model, and which floor does it take off?
Yes. Drop your .ifc file into Autolay's browser viewer and it reads the room boundaries straight from the IfcSpace geometry. It extracts the stories automatically, so you slide the crop box to the floor you want and select the rooms to lay.
What do I get back — real tile counts or just an area?
You get a full take-off: the exact piece count, the number of packs and the waste percentage for the rooms you picked. These are the same numbers that land on the quote and the PDF, produced by the same layout engine used for hand-traced rooms.
Do I need Revit or other design software, or does it run in the browser?
No design software needs to be installed. The web-ifc viewer loads your .ifc file client-side, right in the browser, and the planner is free to use — useful the moment your project is past the sketch stage and already in Revit, ArchiCAD or plain IFC.
Which IFC versions and exports work?
IFC2x3 and IFC4 both load, which covers what Revit, ArchiCAD, Allplan and Vectorworks export by default. Use a coordination-view export with rooms or spaces included and base quantities switched on; that gives the cleanest boundaries. A design-transfer or reference view still works, because the floor extraction reads the geometry itself, but rooms are then selected by their surfaces rather than by name.
My model has no rooms modeled. Can I still take off from it?
Yes. Autolay scans the geometry, keeps the upward-facing surfaces and clusters them by height into stories, so a model exported without IfcSpace entities still yields a floor. You lose the room names and the architect's own area figures, so you select the surfaces to lay by hand — slower than picking named rooms, still far faster than re-tracing a printed plan.
Is my model uploaded to a server?
No. The viewer parses the .ifc file in your own browser, so the model is not sent anywhere to be read. That matters for anything under a confidentiality agreement, which is most commercial work: you can run a take-off on a client's model without the file leaving the machine it is already on.
The area Autolay reports differs from the room schedule in my modeling software. Why?
Because they answer different questions. A room schedule reports the modeled space — usually measured to a defined boundary at a defined height, following the model's own area rules. A flooring take-off reports the surface that actually gets covered, which runs under thresholds and stops at plinths, and which is then laid out plank by plank with an expansion gap. A difference of a few percent between the two is normal; a difference of twenty percent means the boundary needs checking.
The model changed. Do I have to redo the take-off?
Load the new revision and re-run it — that is a minute of work, and it is the reason a model-based take-off is worth having. What you should not do is patch the old quantities by hand: a moved partition changes the perimeter cuts far more than it changes the area, so the waste percentage from the previous revision no longer applies even when the square feet barely move.
In depth: taking off from building models
For planners and estimators: what an export needs to contain, the model faults that cost an afternoon, why the modeled area is not the laid area, and how to go from take-off to order. Open a chapter to read it.
What an IFC file needs to contain before it can be taken off
Not every IFC export is equally useful, and the difference is decided in the exporter dialog rather than in the model. The best case is a coordination-view export that includes rooms or spaces and has base quantities switched on: the file then carries IfcSpace entities with the architect's own boundaries and areas, and rooms can be picked by name. That is the fastest take-off there is — you select the rooms that get flooring and the boundaries are already there.
The common case is less tidy. Rooms are sometimes not modeled at all, base quantities are frequently left off, and a model exported for structural coordination may contain no spaces whatsoever. Autolay handles that by working on the geometry itself: it keeps the upward-facing surfaces, discards ceilings and slab undersides, and clusters what remains by height into stories. You lose the names, not the take-off.
Two practical notes. First, keep the export to the disciplines you need — an architectural model with the full building-services package attached is several times larger and slower to load for no benefit to a floor take-off. Second, if the model was set up on a survey coordinate system, export with a local origin where you can; models placed tens of miles from the origin are a well-known source of precision artifacts in every IFC viewer, not just this one.
IFC2x3 and IFC4 both load; coordination view with spaces and base quantities gives the cleanest result.
No spaces in the model is not a blocker — floors are extracted from the geometry, you just select surfaces instead of names.
Export architecture only where possible; building services and structure add size and load time without adding floor area.
Prefer a local origin over survey coordinates far from zero, and check that the story heights look sane after loading.
The five model faults that cost a take-off an afternoon
Units come first because they break everything else. An IFC written in millimeters and read as meters gives a building a thousand times too large, and the symptom is not an error message but a model that looks empty, because the camera has ended up inside a wall. The check takes five seconds: after loading, look at a story height. If it reads 2.7 the file is sane; if it reads 2700 or 0.0027, the export is wrong rather than the viewer, and re-exporting is faster than rescaling.
Faults two and three are geometry faults that look perfectly fine on screen. A slab modeled as one continuous plate under every partition gives a floor area that includes the walls: correct for the structural engineer, several percent too large for laying. And a floor finish modeled both as an IfcCovering and as the top layer of the slab's material set is counted twice by any tool that takes the geometry at face value. Both announce themselves the same way: the take-off sits a few percent above the room schedule, consistently, in every room.
The last two are organizational. Elements with no story assignment drop out of a by-story selection entirely and are the usual explanation for a room that is simply not there; load without the story filter, look for orphaned geometry, and it turns up. And overlapping spaces — a corridor modeled through the rooms it serves, the same model imported twice — double an area in silence. When a take-off disagrees with the schedule by more than a few percent, work through these five before distrusting the model: four of them are export settings, and the fifth is a ten-minute fix in the authoring tool.
After loading, check one story height: 2.7 is meters and fine, 2700 or 0.0027 is a unit fault in the export.
A slab running under the partitions counts as floor area — trim it to the room boundary, or take the floor from the spaces instead.
A finish modeled as both IfcCovering and a slab layer is counted twice; pick one and leave the other out of the export.
Elements without a story vanish from a by-story selection; duplicated imports and corridors drawn through rooms double the area.
Modeled area and laid area are not the same number
The single most common surprise in a take-off from a building model is that the square feet do not match the room schedule, and it is usually not an error in either. A room schedule measures a space according to a defined rule — to the finished wall face at a stated height, sometimes excluding areas below a certain headroom, sometimes following a national standard the project has adopted. It is an area for reporting.
A flooring take-off measures the surface that gets material on it, which is a construction question. The covering runs under door thresholds to the middle of the leaf, stops at a kitchen plinth or runs beneath it depending on a decision somebody has to make, ignores a column but not the recess behind it, and is then laid out as discrete planks or tiles with an expansion gap at the perimeter. Those decisions can move the number by several percent in either direction.
So treat the schedule as a sanity check, not as the target. If your take-off lands within a few percent of the model's area, the boundary is right. If it lands twenty percent away, something is wrong with the selection — most often a mezzanine counted twice, a shaft included as floor, or a room selected on the wrong story.
Stories, levels and the crop box
Real projects rarely have three clean levels. There are split levels, mezzanines that belong to the story below, plant rooms half a floor up, and models where the site terrain arrived in the same file as the building. All of them confuse a naive by-height clustering, which is why the crop box exists: you slide it to the story you want, and the detected floor follows the box.
Work story by story even when the whole building is loaded. It keeps the selection reviewable — you can see what you have picked highlighted on one level — and it matches how the material will actually be ordered and delivered, which is by floor and by phase rather than by building. It also makes it obvious when a room has been missed, because a gap in the highlighted surface is much easier to see than a missing row in a table.
Check the story heights after loading as a matter of routine. A model whose levels come in at 0, 3.2 and 6.4 meters is behaving; one that reports levels a few millimeters apart usually has each room modeled on its own reference level, and the clustering then needs the crop box rather than the automatic split.
From take-off to tender: rounding, revisions and what to order
A model gives you room-by-room quantities, and the temptation is to order room by room. Do not. Rounding up to whole packs in every room separately buys a part pack of waste per room; rounding once per material and per delivery, across all the rooms that share a covering, can save several percent on a floor of any size. Keep the per-room figures for the schedule and the site plan, and order against the summed figure.
Batch matters as much as quantity on a large job. Rooms laid from different batches of the same product are visibly different under raking light, which is why the order goes out once with the whole quantity rather than floor by floor as the schedule advances. Where a second batch is unavoidable, decide in advance which rooms get it — back of house, storage, a plant room — rather than discovering the difference in the main circulation.
And expect revisions. A model that moves a partition by a foot changes the area by almost nothing and changes the perimeter cuts by a lot, so the honest response to a new revision is to re-run the take-off rather than to adjust the old numbers. It takes a minute, which is the whole argument for having the take-off tied to the model in the first place.
Round to whole packs once per material per delivery, not once per room.
Keep the per-room breakdown for the site plan; order against the total.
Re-run after every model revision — a moved wall changes the cut list more than it changes the area.
Decide in advance which rooms take a second batch if one becomes unavoidable.
Where the model stops and the building starts
A building model is a statement of intent. The building that gets flooring is the one that was actually built, and on a refurbishment those two differ more than anyone likes. Partitions get moved during construction, screeds finish thicker than drawn, and an opening gets blocked up without the model ever hearing about it. A take-off from the model is the right starting point, and on a new build it is usually accurate enough to order from — but it is not a site survey.
The pragmatic workflow is to take off from the model early, when the quantities drive the tender and the schedule, and to verify the rooms that matter before the order goes out. Long, uninterrupted runs and rooms with expensive material are worth a tape measure; a stack of identical cellular offices is not. Where the as-built is genuinely uncertain, a 3D scan of the finished shell gives a boundary from the surfaces as they exist, and it feeds the same layout engine as the IFC boundary does.
Whichever route the boundary comes from, the last step is identical: the room is laid out course by course, the cut pieces are counted, the packs are rounded, and the cut list names each piece and where its offcut goes. That is the number worth ordering against — computed from your model rather than estimated from an area and a rule of thumb.
The moat competitors don't have
Generic online flooring calculators expect you to type in room dimensions by hand. Autolay is one of the very few that reads a building model directly — genuinely useful once your project is past the sketch stage and already in Revit, ArchiCAD, or plain IFC.
Open Workspace 2 from the demo model, laid with the classic oak plank: 1,212 sq ft (112.59 m²), 478 planks, 2.6 % waste — before you order.Try it with our demo building model →
We value your privacy
We use cookies for website statistics (Google Analytics).
We use cookies to analyze our website traffic using Google Analytics and improve your experience. You can read more about how we handle your data in our Privacy Policy and Cookie Policy.
"Accept All" loads Google Analytics, which sets cookies so we can see how the site is used. "Accept Essential Only" does not load Google Analytics. You can change your choice at any time under "Cookie settings" at the bottom of every page.